How I use my Mac
Last updated: 11/3/2026
A beginner's guide to the keyboard setup people keep asking me about, and how to steal the parts you like.
Written with AI: Claude Code drafted this guide from my actual config files and recorded the demos on my screen.
Every so often someone watches me work and asks what's going on with my screen. Windows snap into place on their own. I jump between apps without touching the mouse. A bar at the top shows things the normal Mac bar doesn't.
This guide is the answer. It's written for someone who uses a Mac every day but has never heard of a "tiling window manager" and doesn't want to learn to code. You don't need to copy all of it. Most people should copy one or two things, and I'll tell you which.
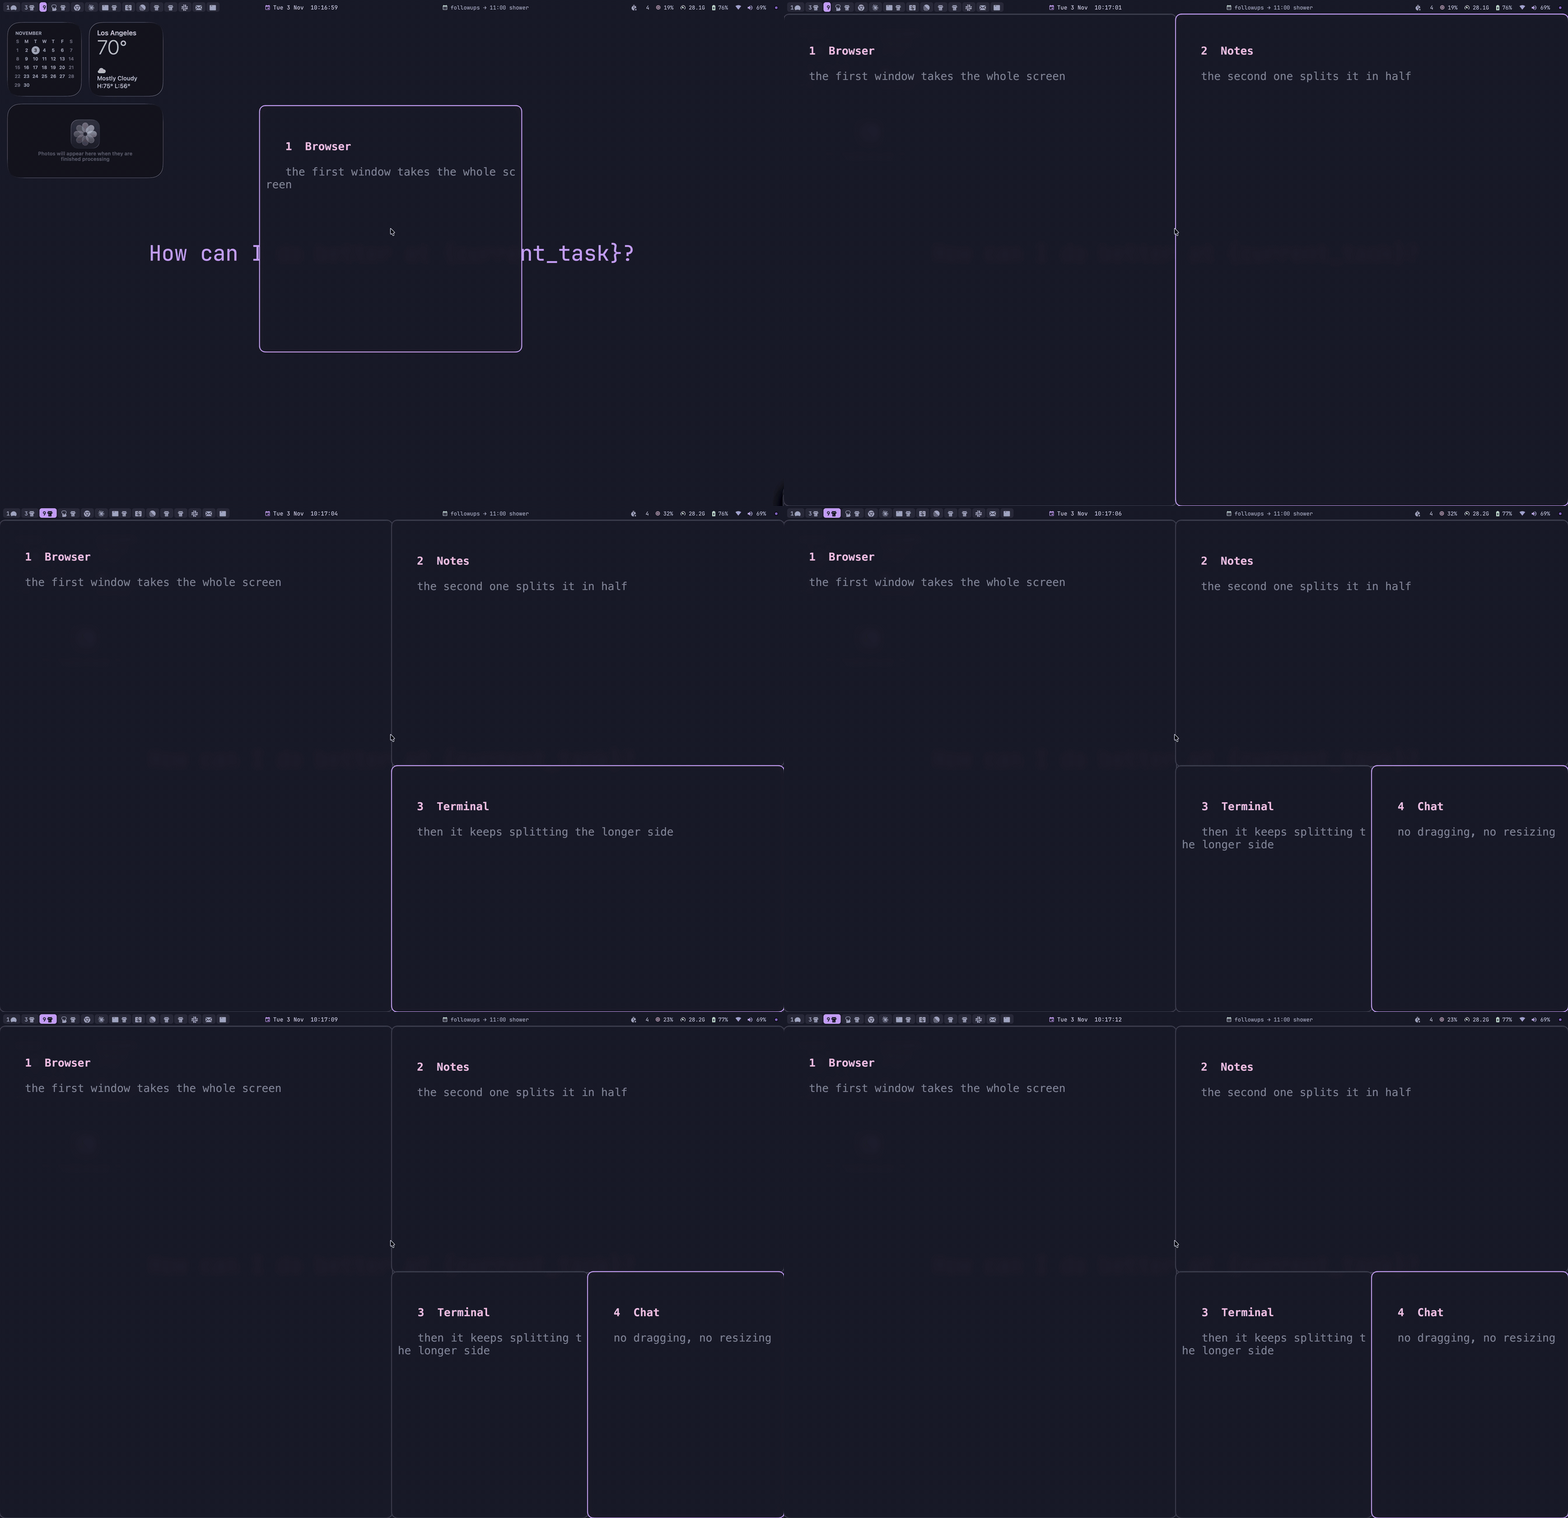
The short version
If you read nothing else:
- Install Raycast and set it to Cmd+Space. It replaces Spotlight and is the best 5 minutes you'll spend on your Mac. Turn on clipboard history.
- Install Wispr Flow and Espanso. Wispr Flow lets you talk instead of type, in any app. Espanso turns short codes like
;;siginto text you type all the time. - If you juggle lots of windows, try AeroSpace for a week. Windows arrange themselves into a grid, and every app gets a keyboard shortcut. It takes an afternoon to set up and about a week to stop reaching for the mouse.
- If you use Claude, connect it to your apps. With MCPs, Claude can read your meetings, email and calendar and draft the follow-ups for you.
- Everything else is optional. Hammerspoon and Karabiner-Elements are for fixing small annoyances. I don't write those scripts myself anymore: I describe the annoyance to Claude and it writes them. At the very top is Nix, which turns your whole Mac setup into text files. Almost nobody should start there.
The one idea behind all of it: every app I use is one keystroke away, and I never arrange a window by hand.
Let Claude set it up for you
You don't have to follow any of the steps below by hand. If you have Claude Code (Anthropic's AI agent that runs in your terminal, on a paid Claude plan), paste this into it and it will do the setup with you, adjusted to the apps you actually use. New to it? Follow its quickstart, type claude in the Terminal app, and paste:
Read https://www.matthandzel.com/guides/how-i-use-my-mac.md. It's a beginner's guide to a keyboard-driven Mac setup (Raycast, Wispr Flow, Espanso, AeroSpace, Claude with MCPs, Hammerspoon, Karabiner, Nix, and an appendix of smaller apps).
Then set up the parts I want, with me:1. Ask me which levels I want, and which apps I use most (browser, chat, email, calendar, notes, music), so each one gets its own workspace key.2. Check what's already installed. Install Homebrew first if it's missing.3. Install and configure each piece I picked, starting from the guide's starter configs and changing them to fit my apps.4. Before changing any config file that already exists, back it up next to the original.5. My real configs and scripts are public at https://github.com/MattHandzel/dotfiles: Hammerspoon scripts in hammerspoon/.hammerspoon/, everything else in nixos/.config/nixos/modules/home/darwin/ (aerospace.nix, raycast-scripts.nix, espanso.nix, karabiner.nix). When the guide describes something without giving the code, read my real file and adapt it instead of inventing one.6. Tell me exactly which macOS permissions to grant (like Accessibility), with the System Settings path, and wait while I click them.7. When a command needs my password (the Homebrew installer, Karabiner), tell me to run it myself in Terminal and wait. Don't buy or start a trial of anything paid without asking.8. After each piece, give me one 10-second test to check it works, and wait for me to confirm before moving on.9. Keep a log at ~/mac-setup-log.md of every app you installed and every file you created or changed (with its backup).10. When you're done, give me a short cheat sheet of my shortcuts, and tell me how to undo each thing you installed.
No Claude Code? Paste the same text into Claude or any chat AI. It can't install things for you, but it will walk you through each step and write the config files for you to save.
Prefer to do it yourself? Every level below has its own setup steps, and all the install commands are in one place near the end.
Pick your level
Each level works on its own. Most people should stop at 2 or 3.
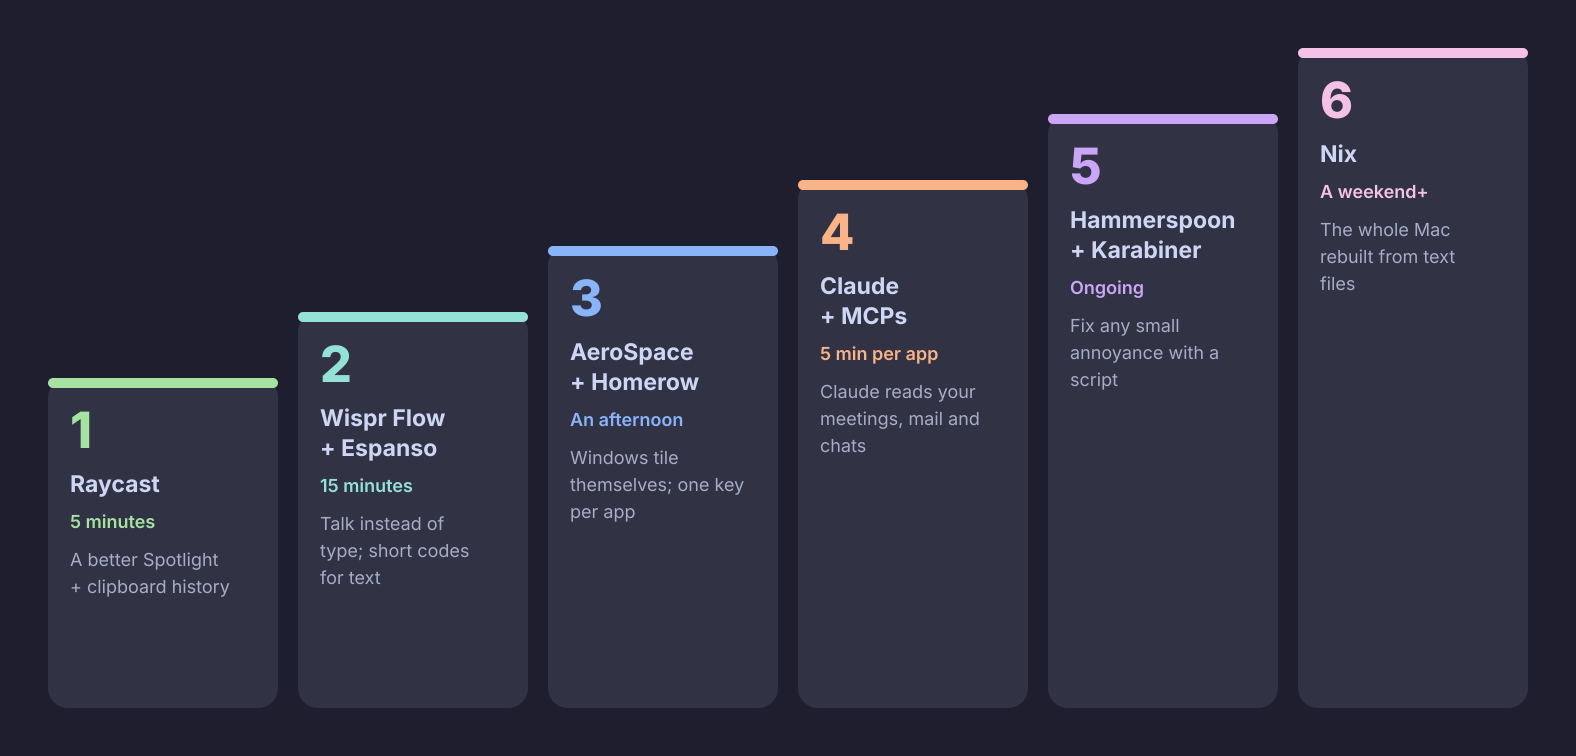
| Level | What you get | Time | Who it's for |
|---|---|---|---|
| 1. Raycast | A better Spotlight, clipboard history, quick commands | 5 minutes | Everyone with a Mac |
| 2. Wispr Flow + Espanso | Talk instead of type; short codes for text you type all the time | 15 minutes | Everyone who writes a lot |
| 3. AeroSpace + Homerow | Windows tile themselves, one key per app, and clicking without the mouse | An afternoon, then a week of getting used to it | People with 5+ windows open at once |
| 4. Claude + MCPs | Claude can read your meetings, email, calendar and chats, and draft for you | 5 minutes per app | Anyone who uses Claude |
| 5. Hammerspoon + Karabiner | Fix any small annoyance with a script | Ongoing | Tinkerers, or anyone with Claude Code |
| 6. Nix | Your whole Mac described in text files, rebuilt with one command | A weekend, then ongoing | People with more than one computer, or who love this stuff |
Everything here is free except Homerow (a one-time purchase, free to try). Raycast and Wispr Flow have paid plans, but the free versions are enough to start. Claude Code needs a paid Claude plan.
Before you start: you need a Mac on a recent macOS, your admin password (for installing things), and 5 minutes for Level 1. On a work laptop, ask IT first. From Level 2 on you'll paste a few lines into the Terminal app (press Cmd+Space, type Terminal, Enter). Most tools here also need Accessibility permission. If one doesn't ask for it, open the right settings page by pasting this into Terminal, then turn the app on in the list:
open "x-apple.systempreferences:com.apple.preference.security?Privacy_Accessibility"The apps that are useful but didn't change how I work (a custom top bar, a better screenshot tool, menu bar tidiers and so on) are in the appendix at the end.
Level 1: Raycast
What it is
When you press Cmd+Space on a Mac, Spotlight opens. You type an app name and hit Enter. Raycast is that, but much better. It's a search bar that can open apps, search files, do math, convert units, show your clipboard history, insert emoji, and run little commands you write yourself.

Why I use it
Any time I want quick access to something, I make it a Raycast command. I have about 78 of my own now. A few I use every day:
- Timer. I type "timer 25" and a 25-minute countdown starts. When it ends, a big alert stays on every screen until I acknowledge it. I don't open a timer app, ever.
- Clipboard history. Everything I've copied in the last few weeks, searchable. This alone is worth installing Raycast for.
- Lid Awake. "lid 10m" keeps my laptop running with the lid closed for 10 minutes. Handy at the airport when I want an agent to keep working in my bag.
- Remind Me. Sends a push notification to my phone at a time I pick.
- Brown Noise. Toggles brown noise on and off. No app, no ads.
- Finance Dashboard, Search Second Brain, Phone. Each opens a tool I built (or Claude built) with one search.
You don't need my custom ones. The built-ins cover most of it.
Set it up (5 minutes)
- Download it from raycast.com and open it.
- During setup, set the hotkey to Cmd+Space. It'll ask to take that over from Spotlight. Say yes. (If it doesn't, turn off Spotlight's shortcut in System Settings → Keyboard → Keyboard Shortcuts → Spotlight, then set it in Raycast.)
- Open Raycast, type Clipboard History, and turn it on. Then give it a hotkey: in Raycast Settings, find Clipboard History in the list and click "Record Hotkey" next to it. I use Option+V. Check it worked: copy two things, press your hotkey, and both should be in the list.
- Do the same for Search Emoji & Symbols (I use Option+E; if you type accents with Option+E, pick another key).
- Try typing things: an app name, "2 usd in eur", "47 * 13", a file name.
That's it. That's level 1.
Make your own commands
This is where Raycast stops being "nicer Spotlight". A script command is a tiny file with a few special comment lines at the top. Raycast reads those lines and turns the file into a command you can search for.
Here's a simplified version of my timer. The easiest way to add it: open Raycast, type Create Script Command, pick Bash, call it Timer, and paste this over the file it makes for you. (If you make the file yourself instead, add its folder in Raycast Settings → Extensions → Script Commands → Add Script Directory, and run chmod +x timer.sh in Terminal, or Raycast won't list it.)
#!/bin/bash# @raycast.schemaVersion 1# @raycast.title Timer# @raycast.mode silent# @raycast.argument1 { "type": "text", "placeholder": "minutes" }
minutes="$1"nohup bash -c "sleep $((minutes * 60)); afplay /System/Library/Sounds/Glass.aiff; osascript -e 'display notification \"Time is up\" with title \"Timer\"'" >/dev/null 2>&1 &echo "Timer set for $minutes min"
Now "Timer" shows up in Raycast and asks how many minutes. Check it worked: run "Timer" with 1, and a minute later you should hear a chime.
My real one is longer: the alert stays on screen until I press a key, and the timer survives Raycast closing. It's the timer command in raycast-scripts.nix, which calls leader-timer.sh, plus timer_alert.lua for the alert. All 78 of my Raycast commands are in that first file.
You don't have to write these yourself. I describe what I want to Claude Code ("make me a Raycast script command that does X") and it writes the file. My rule: if I'll start something myself more than once, it gets a Raycast command.
Level 2: Stop typing so much (Wispr Flow and Espanso)
Most of what I "type" in a day, I don't type. I say it out loud, or it's a short code that turns into the full text. These two take about 15 minutes to set up together, and they work in every app.
Wispr Flow: talk instead of type
Wispr Flow (my referral link) is dictation that actually works. You hold a key, talk, and let go. Clean text appears wherever your cursor is: an email, Slack, a Google Doc, the terminal. It drops the "ums", adds punctuation, and learns the names and words you use.
Since I started using it in September, I've dictated about 145,000 words across about 4,300 dictations. My terminal gets more of them than any other app, because I talk to Claude Code far more than I type to it. Giving an AI the full picture is a lot easier when you can just say it instead of typing three paragraphs.
It also has a meeting notetaker. It records my calls, and Claude can read those notes directly. More on that in the Claude section below.
Set it up (5 minutes):
- Download it with my referral link and open it.
- Give it the permissions it asks for: Microphone and Accessibility.
- Click into any text box, hold the fn key (bottom-left of the keyboard), say something, and let go.
- Add names and words it gets wrong to its Dictionary, so it spells them right next time.
It's free with a weekly limit, which is plenty to find out if you like it. Flow Pro removes the limits.
Espanso: stop typing the same things twice
Espanso is the other half. It's a text expander: you type a short code, and it deletes the code and types the full text instead. It works in every app: email, Slack, the browser, Google Docs, the terminal.
Nearly all of mine start with two semicolons. You never type ;; by accident, so nothing ever expands when you didn't mean it to. Some I use every day:
| I type | It becomes |
|---|---|
;;cal | my booking link |
;;date | today's date, like 2026-11-03 |
;;sig | "Best," with "-Matt" on the next line |
;;followup | "Just following up on this :)" |
;;meetprep | a short paragraph asking someone what they want to get out of our meeting, so I can prepare |
;;intro | my short bio, for intros and forms |
;;md | whatever I copied from a web page, converted to clean Markdown |
;;mac | the link to this guide |
My rule: the third time I type the same sentence, it becomes a trigger.
Set it up (10 minutes):
- Install it:
brew install --cask espanso(or download it from espanso.org). - Open it. macOS will ask for Accessibility permission; turn it on, or nothing will expand.
- Open the Terminal app and run
espanso edit. That opens your triggers file. (If it says "command not found", open it directly withopen ~/Library/Application\ Support/espanso/match/base.yml.) - Replace what's there with this starter, change the details to yours, and save. Espanso picks up the change on its own, no restart needed.
matches:  # Your sign-off. \n is a new line.  - trigger: ";;sig"    replace: "Best,\nYour Name"
  # Things you type all the time.  - trigger: ";;email"    replace: "you@example.com"  - trigger: ";;cal"    replace: "https://cal.com/your-name"  - trigger: ";;followup"    replace: "Just following up on this :)"
# Today's date, filled in fresh every time. - trigger: ";;date" replace: "{{today}}" vars: - name: today type: date params: format: "%Y-%m-%d"- Check it worked: type
;;sigin any text box. If nothing happens, Espanso is missing Accessibility permission (see Before you start).
All my triggers are in espanso.nix if you want ideas.
Level 3: AeroSpace
What a tiling window manager is
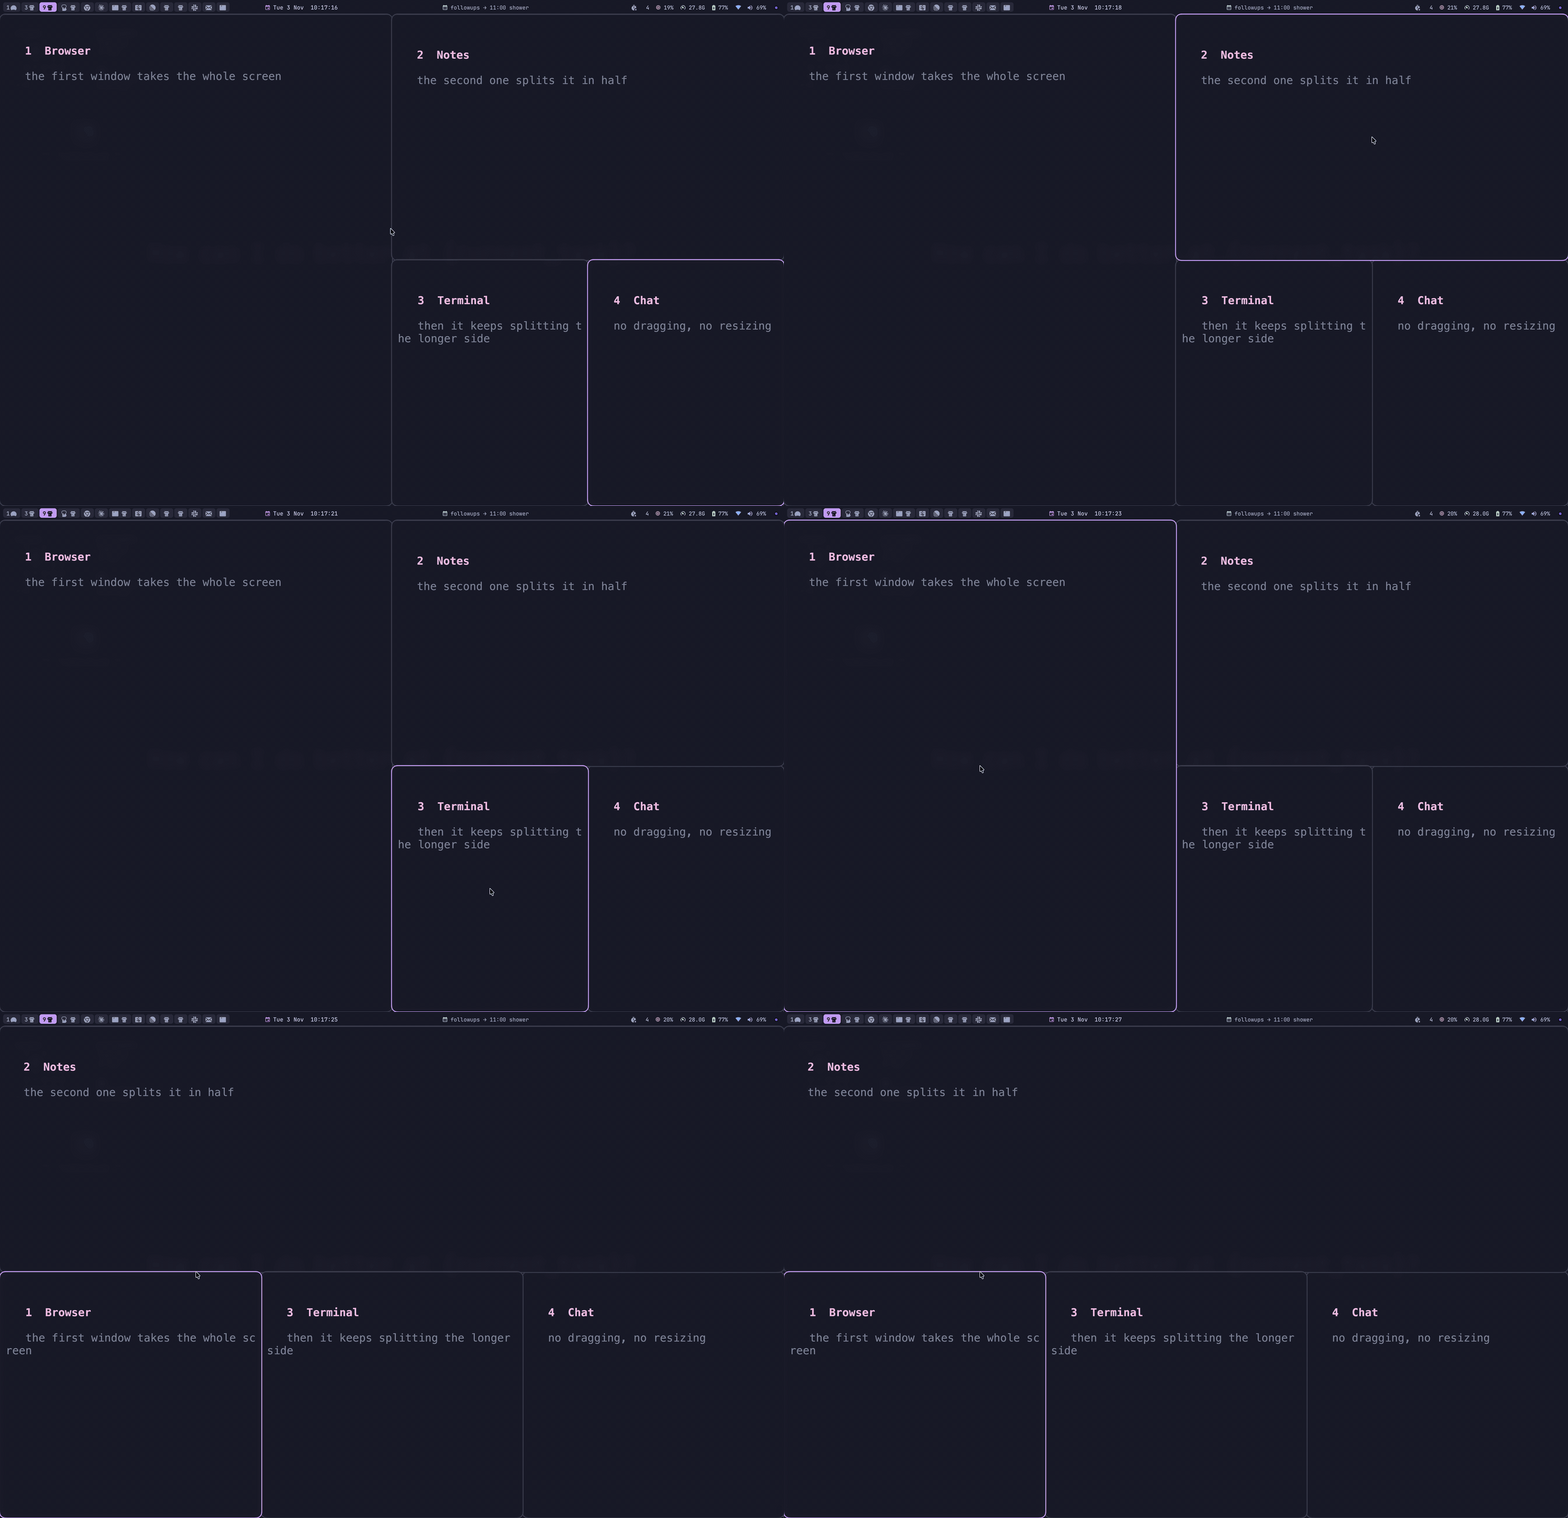
On a normal Mac, windows float. They pile on top of each other, and you drag and resize them by hand. Most people spend more time doing this than they think.
A tiling window manager does the arranging for you. Open one window and it fills the screen. Open a second and the screen splits in half. Open a third and one half splits again. Windows never overlap, and you never drag anything.
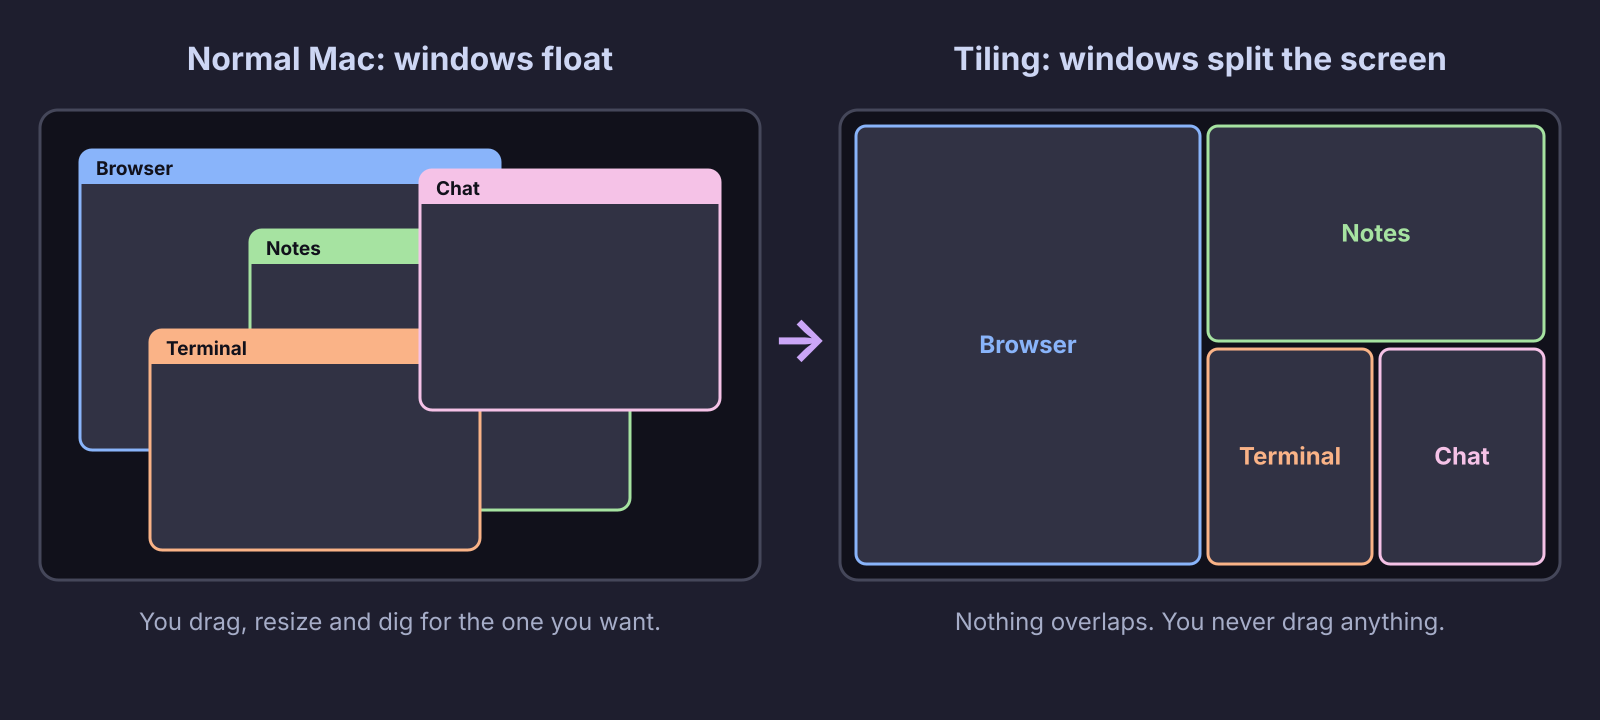
AeroSpace is a free, open-source tiling window manager for macOS. I came from Linux, where this is normal, and AeroSpace was the closest thing I found on the Mac.
Workspaces
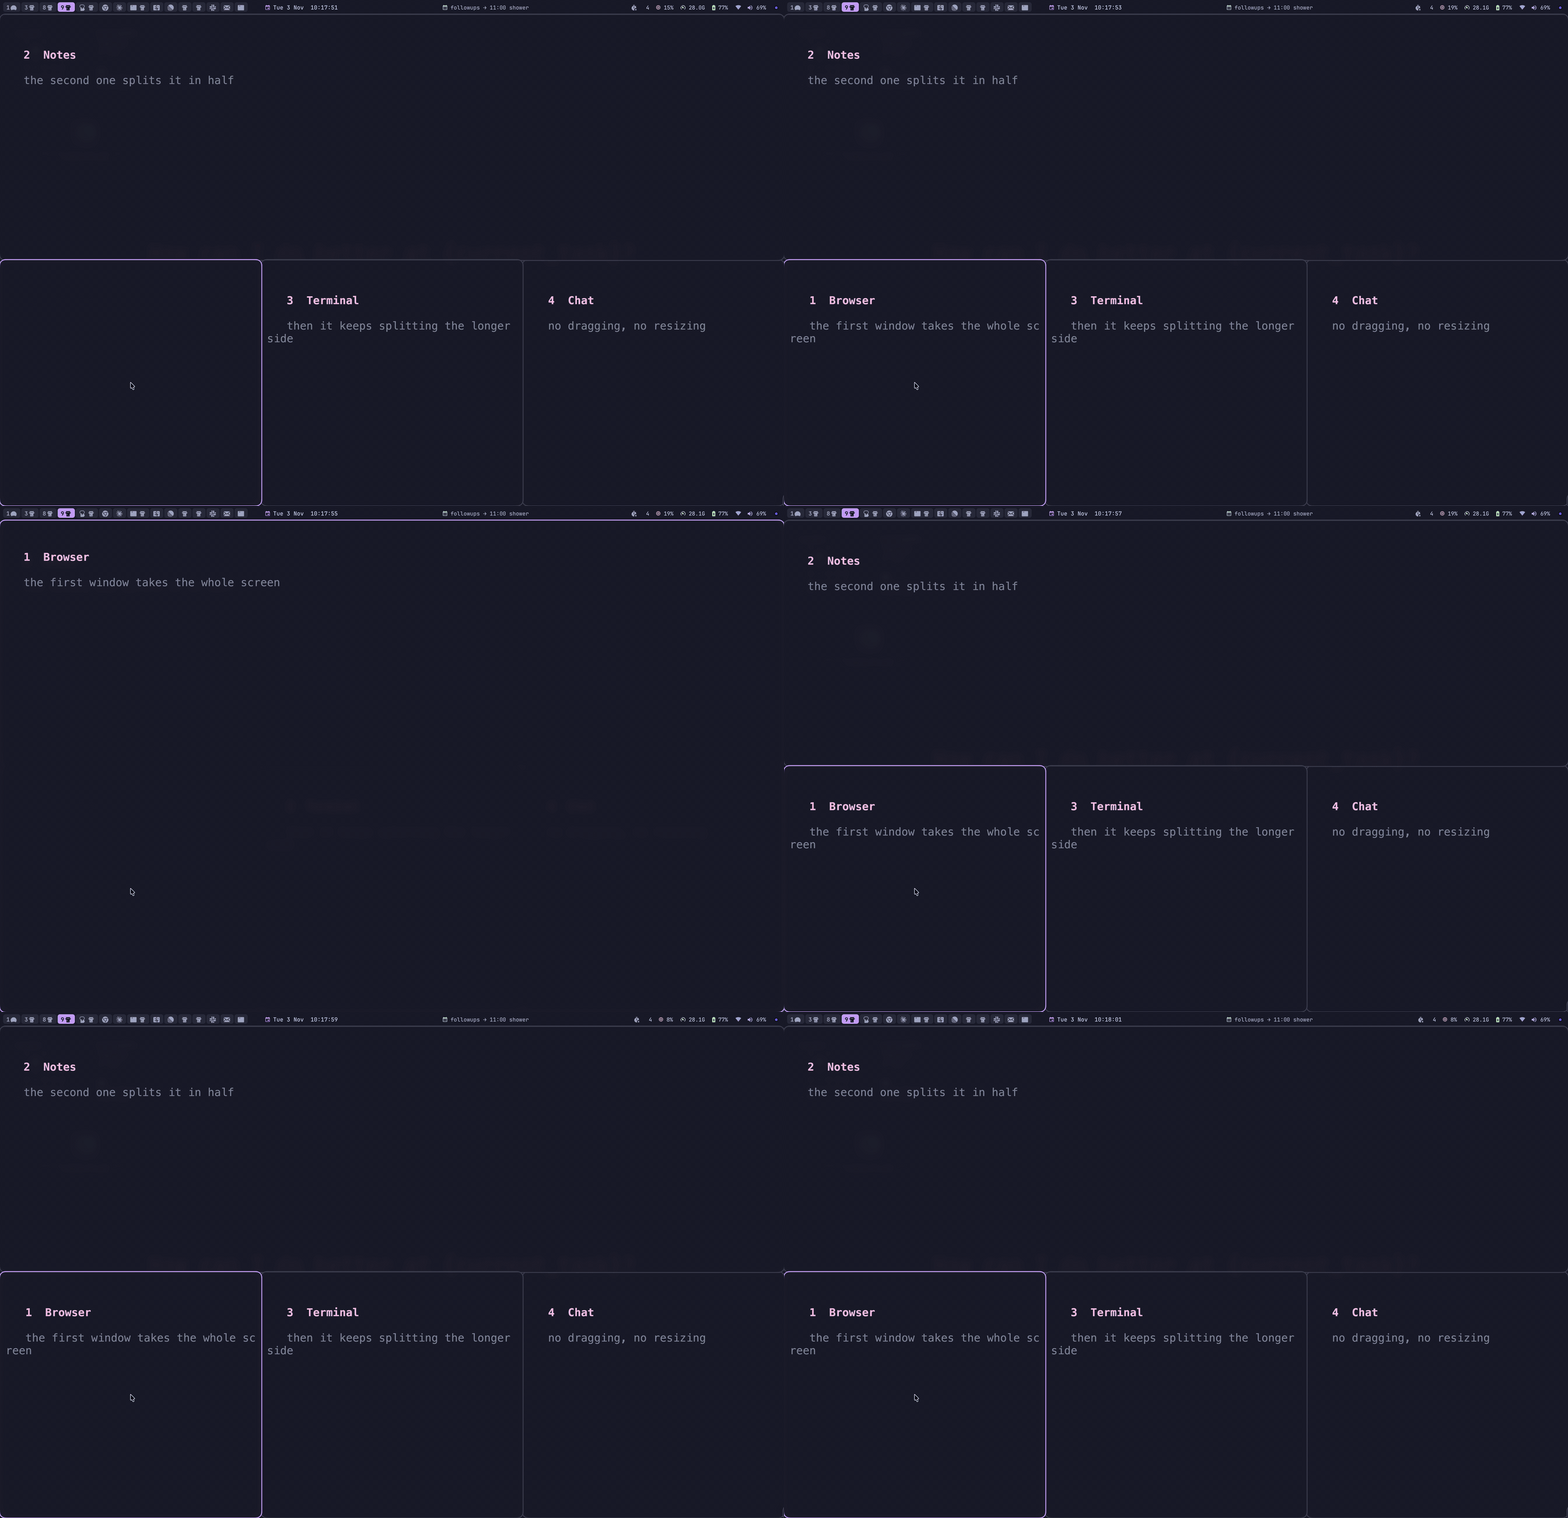
The other half of the idea is workspaces. A workspace is a full screen of windows you can flip to. macOS has a version of this (Spaces), but it's slow and animated. AeroSpace's are instant.
I use them two ways:
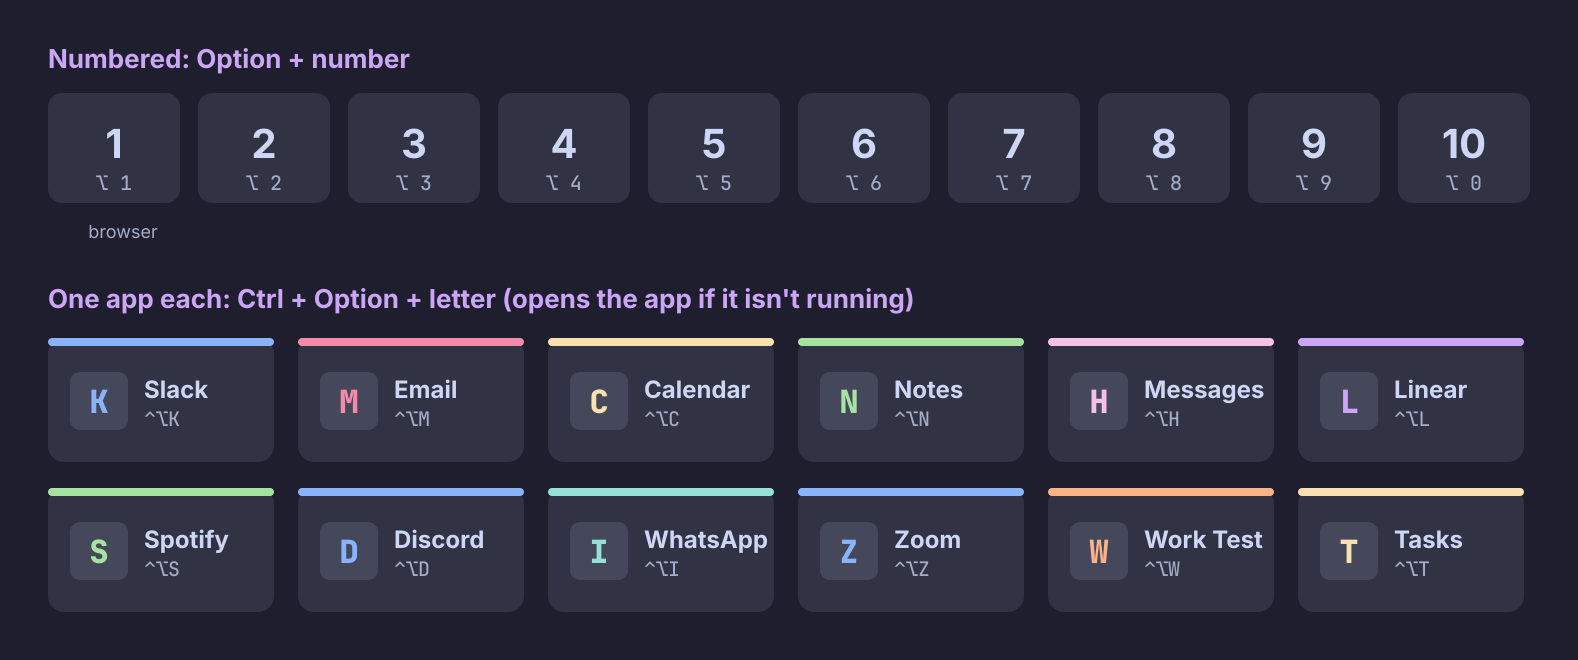
- Numbered workspaces (1 to 10) for whatever I'm working on. Browser on 1, a project on 2, and so on. Option+1 jumps to workspace 1.
- One workspace per app for apps I open all the time: Slack, email, calendar, notes, Spotify. Each one has its own shortcut. Ctrl+Option+K takes me to Slack. If Slack isn't open, it opens it there.
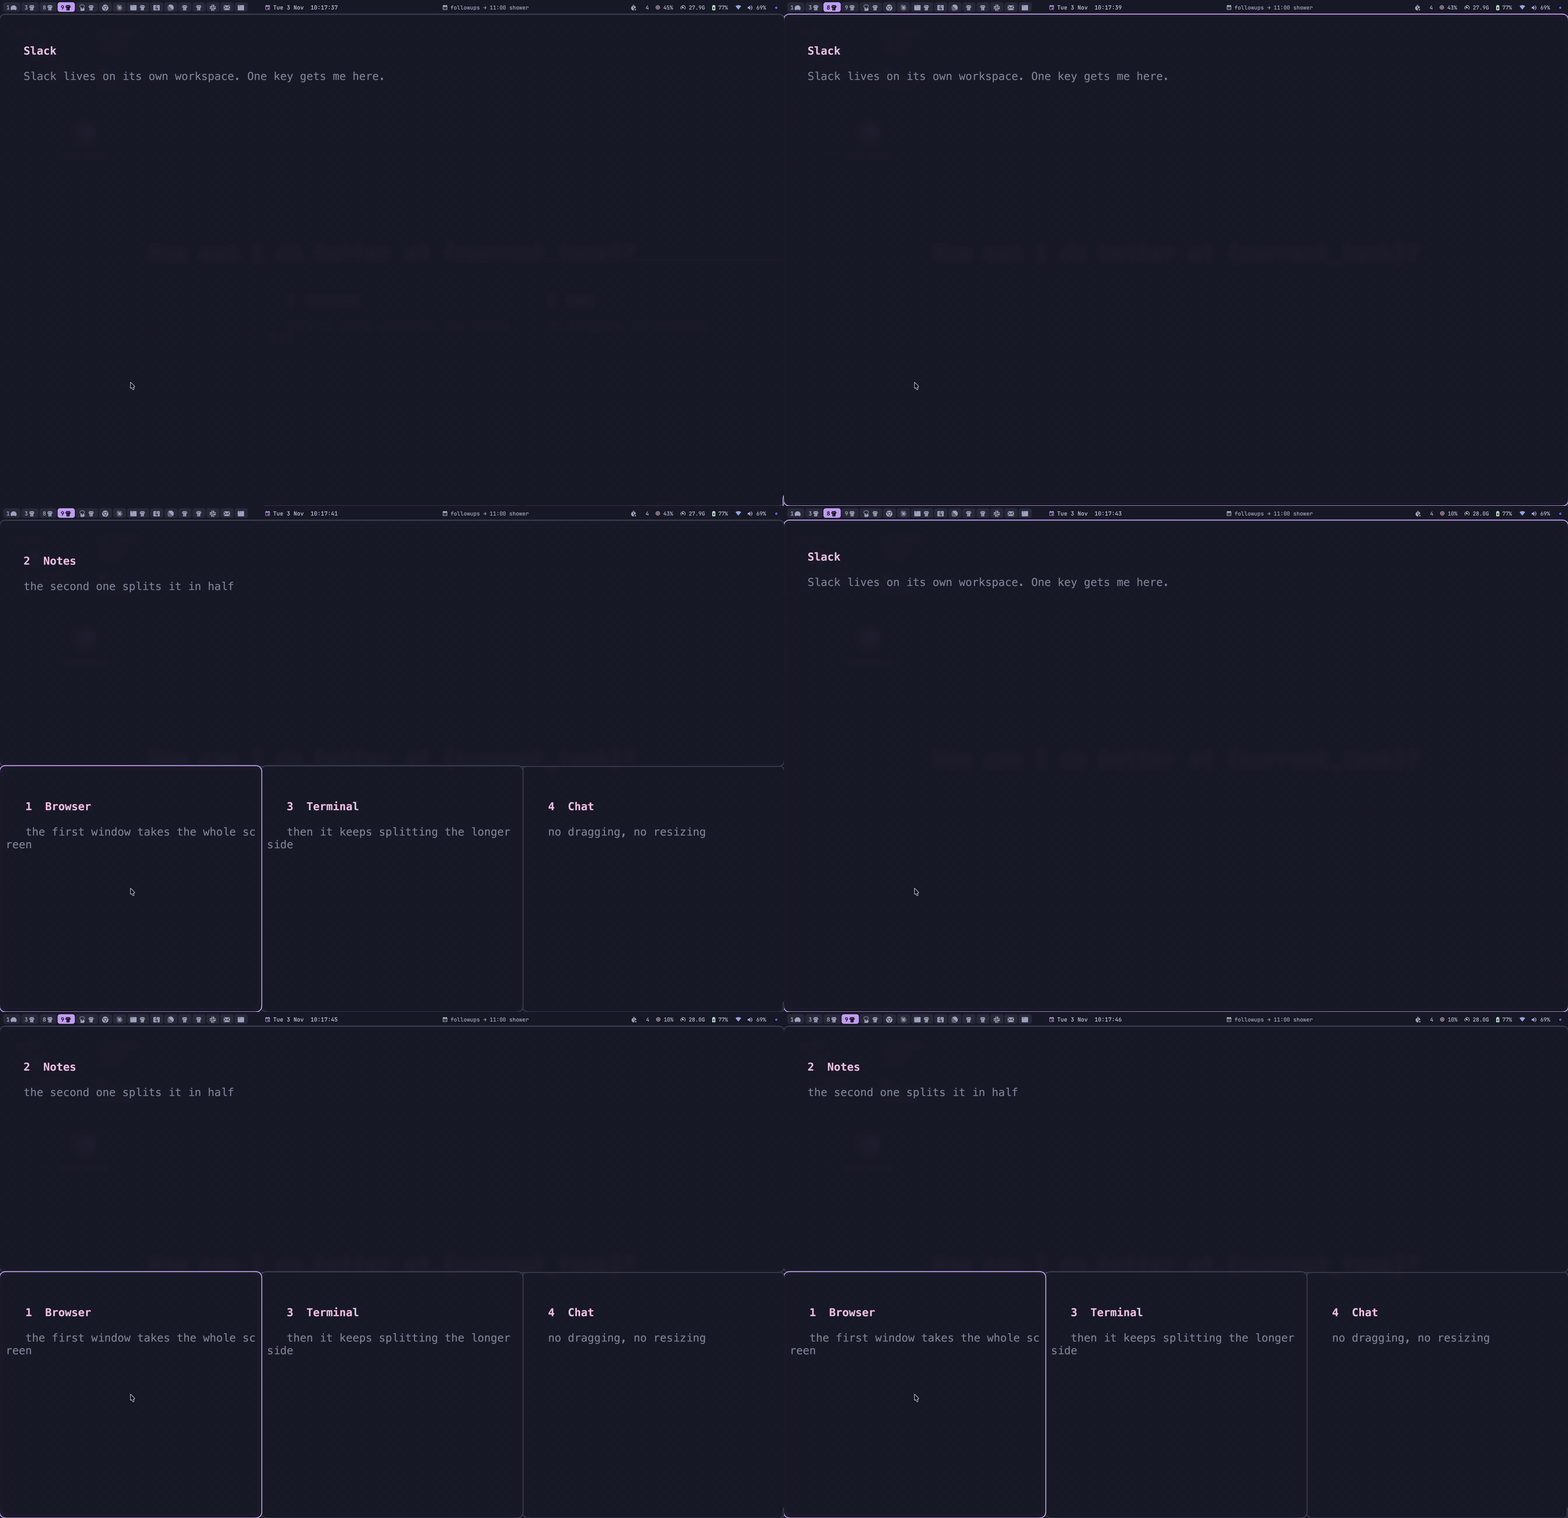
The second one is the real trick. I never Cmd+Tab through 12 apps looking for Slack. Slack is always in the same place, one chord away, and it never gets buried behind other windows.
Moving around
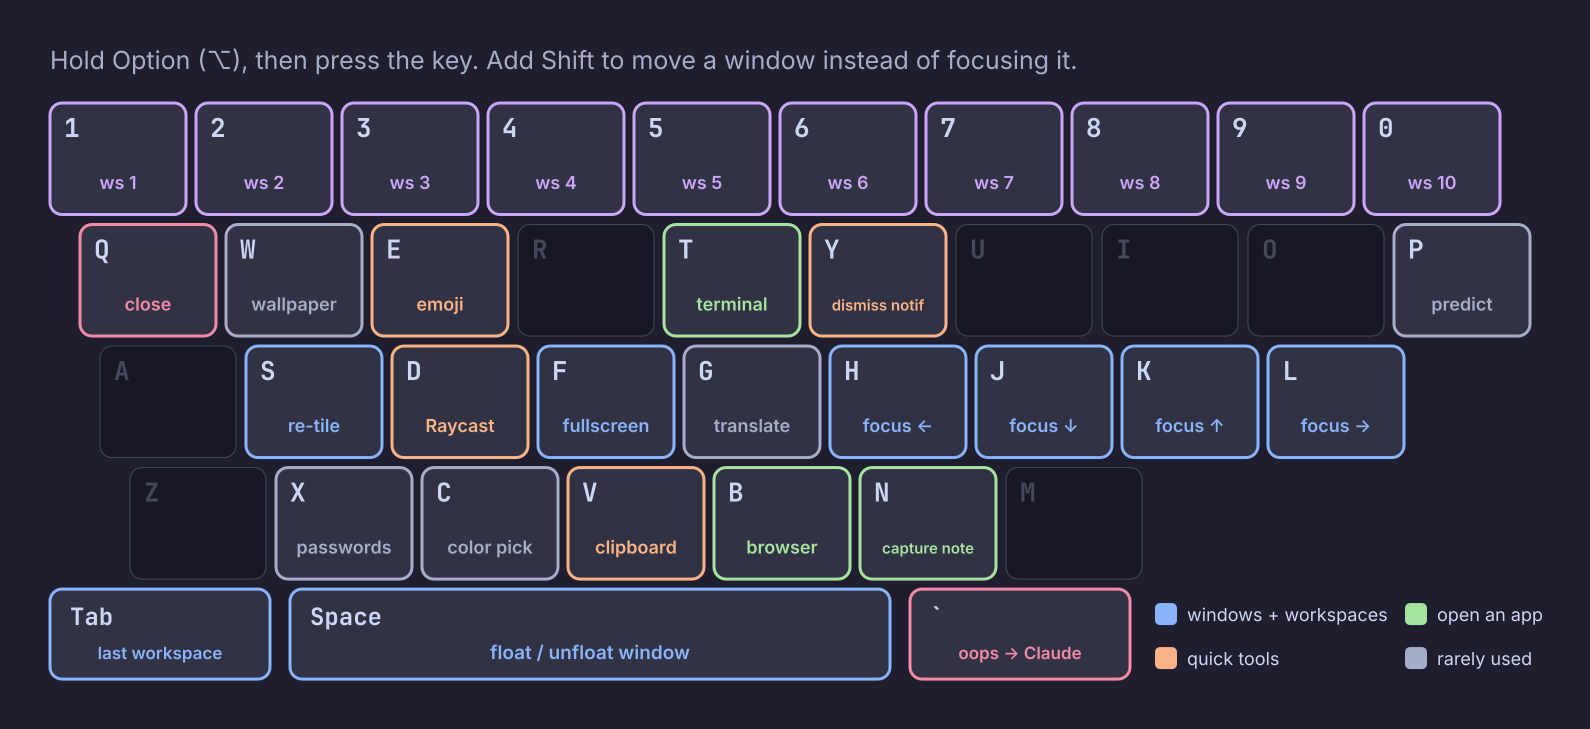
Everything uses the Option key (also labeled ⌥ or Alt). Why Option and not Command? Command already does copy, paste, quit and everything else on a Mac, so there's no room left on it.
The navigation keys are H, J, K, L for left, down, up, right. That's borrowed from the text editor Vim and it feels odd for a day, then natural, because your fingers never leave the home row. You can use arrow keys instead if you prefer.
The keys I actually use daily:
| Keys | What it does |
|---|---|
| Option + H / J / K / L | Move focus left / down / up / right |
| Option + Shift + H / J / K / L | Move the window left / down / up / right |
| Option + 1 to 0 | Go to workspace 1 to 10 |
| Option + Shift + 1 to 0 | Send the window to workspace 1 to 10 |
| Option + Tab | Jump back to the last workspace |
| Option + F | Fullscreen this window (again to undo) |
| Option + Space | Float this window (take it out of the grid) |
| Option + S | Fix a messed-up layout back into tiles |
| Option + T / B | Open a new terminal / browser window |
| Ctrl + Option + letter | Go to an app's own workspace (K = Slack, M = Mail, C = Calendar, N = Notes) |
Every key in that table is in the starter config below. My full config, with far more apps, is aerospace.nix.
Set it up (an afternoon)
- Install it. If you have Homebrew (a tool for installing Mac apps from the terminal):
Otherwise, download it from the AeroSpace releases page.bashbrew install --cask nikitabobko/tap/aerospace
- Open it. macOS will ask for Accessibility permission (System Settings → Privacy & Security → Accessibility). Turn it on. AeroSpace can't move windows without it.
- Create a file at
~/.aerospace.toml(that's a file called.aerospace.tomlin your home folder) and paste in the starter config below. - Reload it from AeroSpace's menu bar icon → Reload config.
- Check it worked: open two Finder windows. They should split the screen side by side, and Option+H / Option+L should move between them. If they float, check that AeroSpace has Accessibility permission and isn't disabled in its menu bar icon. Expect it all to feel strange for a day or two.
A starter config
This is a stripped-down version of mine with the 20% that gives 80% of the value. Comments (lines starting with #) explain each part. Change the app names to the apps you actually use.
# Start AeroSpace when you log in.start-at-login = true
# Small gaps so you can see where one window ends.[gaps]inner.horizontal = 6inner.vertical = 6outer.left = 6outer.right = 6outer.top = 6outer.bottom = 6
[mode.main.binding]# Move focus between windows.alt-h = 'focus left'alt-j = 'focus down'alt-k = 'focus up'alt-l = 'focus right'
# Move the window itself.alt-shift-h = 'move left'alt-shift-j = 'move down'alt-shift-k = 'move up'alt-shift-l = 'move right'
# Numbered workspaces.alt-1 = 'workspace 1'alt-2 = 'workspace 2'alt-3 = 'workspace 3'alt-4 = 'workspace 4'alt-5 = 'workspace 5'alt-6 = 'workspace 6'alt-7 = 'workspace 7'alt-8 = 'workspace 8'alt-9 = 'workspace 9'alt-0 = 'workspace 10'alt-shift-1 = 'move-node-to-workspace 1'alt-shift-2 = 'move-node-to-workspace 2'alt-shift-3 = 'move-node-to-workspace 3'alt-shift-4 = 'move-node-to-workspace 4'alt-shift-5 = 'move-node-to-workspace 5'alt-shift-6 = 'move-node-to-workspace 6'alt-shift-7 = 'move-node-to-workspace 7'alt-shift-8 = 'move-node-to-workspace 8'alt-shift-9 = 'move-node-to-workspace 9'alt-shift-0 = 'move-node-to-workspace 10'
# Handy extras.alt-tab = 'workspace-back-and-forth'alt-f = 'fullscreen'alt-space = 'layout floating tiling'alt-s = 'layout tiles horizontal vertical'alt-minus = 'resize smart -50'alt-equal = 'resize smart +50'
# New terminal window, new browser window. Swap in your own apps.alt-t = 'exec-and-forget osascript -e "tell application \"Terminal\" to do script \"\""'alt-b = 'exec-and-forget open -na Safari'
# One workspace per app: jump there, and open the app if it isn't running.alt-ctrl-k = ['workspace Slack', 'exec-and-forget open -a Slack']alt-ctrl-m = ['workspace Mail', 'exec-and-forget open -a Mail']alt-ctrl-c = ['workspace Calendar', 'exec-and-forget open -a Calendar']alt-ctrl-n = ['workspace Notes', 'exec-and-forget open -a Notes']
# Send those apps to their workspace whenever they open a window.[[on-window-detected]]if.app-name-regex-substring = '^Slack$'run = 'move-node-to-workspace Slack'
[[on-window-detected]]if.app-name-regex-substring = '^Mail$'run = 'move-node-to-workspace Mail'
[[on-window-detected]]if.app-name-regex-substring = '^Calendar$'run = 'move-node-to-workspace Calendar'
[[on-window-detected]]if.app-name-regex-substring = '^Notes$'run = 'move-node-to-workspace Notes'
To add another app, copy the last block, change the name, and add a matching alt-ctrl-<letter> line. If you're not sure what an app is called, run aerospace list-apps in the terminal while it's open.
Things that tripped me up
- Option + letter normally types special characters (Option+E starts an accent, Option+2 is ™). Once AeroSpace takes those keys, you lose them. If you type in a language with accents, pick a different modifier or leave the letters you need free.
- Some windows shouldn't tile. Little popups, login windows and settings panels look silly stretched across half the screen. AeroSpace lets you float them automatically with an
on-window-detectedrule that saysrun = 'layout floating'. I have rules for sign-in windows, small dialogs, and a few apps. - "Focus follows mouse" broke Raycast for me. AeroSpace can focus whatever window your mouse is over. But Raycast's search bar floats above everything, so the window behind it grabbed focus the moment I nudged the mouse. I turned that feature off.
- Windows that were open before AeroSpace started don't tile until you touch them. Option+S or a quick restart of the app fixes it. I had Claude write a small script that fixes this automatically at login (
aerospace-retilein aerospace-helpers.nix). - Option+Space is taken. The starter uses it to float a window. If your Raycast hotkey is Option+Space, delete the
alt-spaceline or Raycast stops opening. - macOS permissions are the most annoying part of all of this. Every tool here wants Accessibility access, and some want Input Monitoring or Screen Recording too. When something "just stops working" after an update, check System Settings → Privacy & Security first.
Add borders (2 minutes)
JankyBorders draws a colored border around the window you're typing in. With tiled windows it's easy to lose track of which one is active, and this fixes that:
brew tap FelixKratz/formulaebrew install bordersbrew services start bordersHomerow: click anything without the mouse
AeroSpace gets you to the right window. Homerow handles what's inside it. Press its shortcut and a small letter label appears on every button and link on screen. Type the letters and it clicks that thing. It works in every app, so between AeroSpace and Homerow you can do almost everything without touching the trackpad.
It's a one-time purchase, and you can try it for free first: brew install --cask homerow.
Level 4: Let Claude use your apps (Claude Code and MCPs)
What it is
Claude Code is Anthropic's AI agent. It runs in your terminal and can read and write files, run commands, and fix things on your computer. Nearly everything in this guide was built or fixed by it.
On its own, an AI only knows what you paste into it. An MCP (Model Context Protocol) is a plug that connects it to another app: your email, calendar, chats, browser, meeting notes. Once it's connected, Claude can look things up there and do things there when you ask. "What did I promise Sarah in yesterday's meeting? Draft the follow-up email" just works, because Claude can read the meeting and write the draft.
The ones I use
| MCP | What I use it for |
|---|---|
| Wispr Flow | Reading the notes and transcript of any meeting I recorded. After a call I tell Claude to process it: it writes up the notes, lists what each person said they'd do, and drafts my follow-ups |
| Gmail and Google Calendar | Finding emails, drafting replies, finding a time that works and putting it on my calendar |
| Google Drive | Reading and editing Google Docs |
| Claude in Chrome | Claude drives my real browser, for websites that have no MCP: forms, dashboards, booking things |
| Beeper | Beeper puts WhatsApp, Signal, LinkedIn and my other chats in one app. I use the Beeper MCP so Claude can read my chats for context |
| Slack and Linear | Reading threads, and keeping my task board up to date |
| Dayflow | Answering "what was I doing at 3pm on Tuesday" from Dayflow's timeline of my screen |
My rule: Claude drafts, I send. It writes emails and messages as drafts, and I press send myself.
Connect the Wispr Flow MCP (5 minutes)
You need Wispr Flow with its meeting notetaker on (record at least one meeting first, so there's something to read). MCP access is included on the free plan.
- In Wispr Flow, open Settings → MCP and click Add to Claude. It opens Claude in your browser.
- Sign in to your Wispr Flow account and approve access. Access is read-only: Claude can read your meetings but can't change or delete them.
- In a Claude chat, turn it on with the + button → Connectors → Wispr Flow.
- Ask "What did we decide in my last meeting?" If the answer mentions your real meeting, it works.
Connectors you add on claude.ai also show up in Claude Code when you're signed in with the same account. For any other AI app, Wispr's MCP settings show a server URL you can paste in instead. Wispr's own setup guide has the details.
Add more MCPs
- In Claude (web or desktop): Settings → Connectors. Gmail, Google Calendar, Google Drive, Slack, Linear and many others are a click away.
- In Claude Code: ask it. "Add the MCP server for X" works, or run
claude mcp addyourself. - Start with read-only access where an app offers it, and only connect apps you'd be fine with Claude reading.
Level 5: Hammerspoon and Karabiner
This is the "fix anything" level. You don't need it. I use it because small annoyances add up, and here I can fix each one for good.
Hammerspoon
Hammerspoon is an app that runs little scripts in the background. The scripts can react to almost anything: a key you press, an app opening, a monitor being plugged in, the laptop waking up. They're written in a language called Lua, but Claude wrote nearly all of mine. I tell it what's bugging me and it writes the script.
Here's what mine do, in plain words. The "Steal it?" column is my honest take on whether a normal person would want it.
| What it does | Why | Steal it? |
|---|---|---|
| Option+Y dismisses the top notification; Option+Shift+Y clears them all | Notifications pile up in the corner and I hate reaching for the mouse to close them | Yes |
| Option+Left/Right goes back and forward in the browser | That's how it works on Linux and Windows; on Mac it's Cmd+[ | If you came from Windows |
| Cmd+Delete deletes one word, not the whole line | I kept wiping out entire lines in Google Docs | Maybe |
| Option+Q closes the window under the mouse, not the one that's focused | I'd point at a window, press close, and lose a different one | If you use AeroSpace |
| Timer alerts stay on screen until I press a key, and play a sound even when my headset is muted | I missed most of my timers because the normal notification vanished in 5 seconds | Yes |
| Focus Mode: distracting apps take 15 seconds to open | It's enough of a pause to ask "do I actually want to open Discord right now?" | Yes, if you check apps on reflex |
| Plugging in or unplugging my monitor puts my workspaces back on the right screens | AeroSpace dumps everything onto one screen when a monitor disappears and never moves it back | If you use AeroSpace with a monitor |
| Brightness at 0 turns both screens fully dark, including the external monitor | macOS only dims the built-in screen | No |
| Warns me when macOS has frozen an app to save memory | A frozen app silently made everything else slow | No |
| Logs everything I copy, so I can search it later | Part of a bigger personal logging system | No |
Every row is a small file in my dotfiles, loaded by init.lua. The ones I'd steal first: timer_alert.lua (sticky timer alerts), focus_gate.lua (Focus Mode), hover_close.lua (Option+Q) and display_arrangement.lua (monitor plug and unplug). The notification keys and Cmd+Delete live in init.lua itself. To take one, paste its link into Claude Code and say "adapt this for my Mac".
Here's a small one you can try by hand. It makes Option+Left and Option+Right go back and forward in your browser. After installing Hammerspoon, give it Accessibility permission (it asks on first launch), click its menu bar icon → Open Config, paste this in, then click Reload Config. Heads up: inside browser text boxes, Option+Left/Right normally jumps a word, and this replaces that.
-- Option+Left / Option+Right = browser back / forward.local browsers = {  ["com.google.Chrome"] = true,  ["com.apple.Safari"] = true,  ["company.thebrowser.Browser"] = true, -- Arc}
browserTap = hs.eventtap.new({ hs.eventtap.event.types.keyDown }, function(e)  local key = e:getKeyCode()  local flags = e:getFlags()  local app = hs.application.frontmostApplication()  if not (flags.alt and not flags.cmd and not flags.ctrl and not flags.shift) then return false end  if not app or not browsers[app:bundleID()] then return false end  if key == 123 then hs.eventtap.keyStroke({ "cmd" }, "[", 0, app) return true end  if key == 124 then hs.eventtap.keyStroke({ "cmd" }, "]", 0, app) return true end  return falseend)browserTap:start()
Check it worked: open any page in Chrome or Safari, click a link, then press Option+Left. You should go back.
The pattern is always the same: "when X happens, do Y". Once you see it that way, you start noticing dozens of small things you could fix.
Karabiner-Elements
Karabiner-Elements remaps keys. I keep mine to a few rules:
- Caps Lock and Escape are swapped. Caps Lock is a big key in a great spot that most people never use. I use Escape all the time.
- Option+Escape (the physical Escape key, since it's now Caps Lock) switches my keyboard between English and Polish.
- In the terminal only, the left Command key acts as Control, so shortcuts from Linux work the same.
- Print Screen becomes F13, so I can bind screenshots to it.
If you only do one, do the Caps Lock one. You don't even need Karabiner for that: System Settings → Keyboard → Keyboard Shortcuts → Modifier Keys lets you turn Caps Lock into Control (and on recent macOS, Escape).
With Karabiner: open it, go to Simple Modifications, click Add item, and set caps_lock → escape. The first time, macOS also wants you to allow Karabiner's driver (System Settings → General → Login Items & Extensions → Driver Extensions) and give it Input Monitoring; Karabiner walks you through both. My rules are in karabiner.nix.
Level 6: Nix
This is the top of the ladder, and the one I'd tell most people to skip. But it's the thing underneath everything else in this guide, so here's what it is.
What it is
Normally you set up a Mac by clicking. You install apps, tick boxes in System Settings, drop config files in your home folder. A year later nobody knows exactly what you changed, including you. If the laptop dies, you start over from memory.
Nix flips that around. You write down what your computer should look like in a set of text files: which apps are installed, which settings are on, what every config file says, which background jobs run. Then one command makes the computer match the files. Change a line, run the command again, and the change is applied. Delete the line, run it again, and the change is gone.
On a Mac this comes in three pieces:
- Nix itself, the tool that installs software and builds everything from your files. I installed it with the Determinate Systems installer, which is the easiest way on a Mac.
- nix-darwin, which handles the Mac itself: System Settings, apps, background services.
- home-manager, which handles everything in your home folder: config files for your terminal, editor, AeroSpace and so on.
All of it lives in one folder that's tracked with git (a tool that keeps the full history of every change), so I can see what changed, when, and undo it.
Why I use it
I came to the Mac from NixOS, a version of Linux that works entirely this way, and I still have a Linux desktop and a home server running it. Nix lets all three share one set of files. My terminal, editor, shell and command-line tools are configured once and work the same on every machine.
Everything else in this guide lives in there too:
- My AeroSpace config isn't a file I edit by hand. Nix generates it from aerospace.nix.
- My Raycast script commands are installed by Nix.
- The 84 small background jobs on my Mac (syncing notes, backups, the "oops" recorder below) are defined in it.
- Key repeat speed, the Dock, Finder, trackpad settings: all written down, not clicked.
In total it's about 250 Nix files. I didn't write most of them by hand. Claude edits them, and I've given it permission to apply the changes itself, so "add a Raycast command for X" goes from request to working without me touching anything.
What it looks like
Here's a small example. This says "install kitty and ripgrep, hide the Dock, make key repeat fast, and install Raycast and Hammerspoon from Homebrew":
{ pkgs, ... }: {  environment.systemPackages = [ pkgs.kitty pkgs.ripgrep ];
  system.defaults.dock.autohide = true;  system.defaults.NSGlobalDomain.KeyRepeat = 2;
  homebrew.enable = true;  homebrew.casks = [ "raycast" "hammerspoon" ];}
Then you apply it from the terminal (it asks for your password; my-mac is whatever name your config gives this Mac):
sudo darwin-rebuild switch --flake .#my-macThe honest costs
- It's hard to learn. Nix has its own language, and its error messages are some of the worst I've seen. Without Claude I'd spend a lot of time stuck.
- Some Mac apps don't fit. Apps that need special Mac permissions (like AeroSpace or Karabiner) still come from Homebrew. Nix just lists them.
- Updates can break things. Usually you roll back one generation and move on, but it's a weekend of setup and a little upkeep after.
Steal it?
Probably not, unless one of these is true:
- You have more than one computer and want them set up the same.
- You've lost a setup before and never want to rebuild one from memory again.
- You're happy to let an AI agent do the editing, and you just want the result.
The 80% version without Nix: put your config files (~/.aerospace.toml, your Hammerspoon folder, your Raycast scripts) in a git repo, and save your app list with brew bundle dump (it writes every app you installed with Homebrew into one file, called a Brewfile). That gets you most of the "I could rebuild this laptop in an hour" benefit in 15 minutes.
If you do want to try it: install Nix with the Determinate installer, follow the nix-darwin README to make a starter config, then ask Claude Code to move your existing settings into it one at a time. My own config is public in my dotfiles repo if you want to see what a big one looks like.
The trick that made all of this work: an "oops" button
Here's the honest part. A setup like this breaks in small ways all the time. A window doesn't tile. A shortcut fires twice. Something worked yesterday and doesn't today.
So I built one more shortcut: Option+` (the key above Tab). When something goes wrong, I press it. It grabs a record of the last 90 seconds (which keys I pressed, which apps I switched between, where I clicked) and hands it to Claude along with a note of what I expected. Claude figures out what happened, writes it down in a log, and tries to fix it.
I've pressed it 174 times since mid-September. A lot of the rules, fixes and odd exceptions in this guide came out of those presses. That's the real reason my setup feels smooth: not that I'm good at configuring things, but that fixing a problem costs me one keystroke.
Mine is oops.lua (the key and the recorder) plus oops.nix (the job that hands it to Claude). It's a lot of plumbing. You don't need to build this to get the benefit. The lesson is: when something annoys you twice, write it down and have Claude fix it instead of living with it. The 2-minute version: a Raycast command or Espanso trigger that opens a note titled with the time, where you jot what broke and what you expected.
A normal morning, in keystrokes
To make this concrete, here's roughly what the first half hour of a workday looks like.
- Open the laptop. Option+1 puts me in my browser on workspace 1.
- Ctrl+Option+C opens my calendar on its own workspace. I check the day. Option+Tab takes me straight back to where I was.
- Ctrl+Option+N opens my notes. I write down the first task.
- Option+D (my Raycast key; most people use Cmd+Space), type "timer 50", Enter. A 50-minute block starts.
- Option+T opens a terminal. It slots in next to the browser on its own; I don't resize anything.
- I need something I copied an hour ago: Option+V, type two words of it, Enter.
- A Slack notification pops up. Option+Y dismisses it. I check Slack after the timer, not now.
- Timer goes off. Ctrl+Option+K takes me to Slack. Option+Tab brings me back.
None of this is fast because I type fast. It's fast because I never look for anything. Every app is always in the same place.
What I'd tell a friend starting today
- Start with Raycast and Wispr Flow. Use them for a week before adding anything else.
- Add AeroSpace only if window juggling actually bugs you. If you live in one fullscreen browser, you don't need it.
- Give each new shortcut a week before you judge it. The first two days with tiling feel slower. By day five you'll be annoyed on other people's computers.
- Don't copy my config. Copy the starter config above, then add a shortcut each time you notice yourself reaching for the mouse for the same thing twice.
- Let Claude write the scripts. "Make an AeroSpace shortcut that opens Spotify on its own workspace" or "write a Hammerspoon script that does X" works really well. You don't have to understand Lua or TOML to own a setup like this.
- Keep a cheat sheet open for the first week. Screenshot the one below. Mine is a searchable list that pops up with Option+F1 (
aerospace-cheatsheetin aerospace-helpers.nix).
Install commands, all in one place
Every command below goes in the Terminal app (press Cmd+Space, type "Terminal", Enter). Paste one line at a time.
First, Homebrew, the tool that installs everything else. Skip this if brew --version already prints a number.
/bin/bash -c "$(curl -fsSL https://raw.githubusercontent.com/Homebrew/install/HEAD/install.sh)"Level 1, Raycast:
brew install --cask raycastLevel 2, Wispr Flow and Espanso:
brew install --cask wispr-flow espansoLevel 3, AeroSpace, borders and Homerow:
brew install --cask nikitabobko/tap/aerospace homerowbrew install FelixKratz/formulae/borders && brew services start bordersLevel 4, Claude and MCPs: install Claude Code, then add connectors in Claude's Settings → Connectors. The Wispr Flow one is added from Wispr Flow's own Settings → MCP.
Level 5, Hammerspoon and Karabiner:
brew install --cask hammerspoon karabiner-elementsLevel 6, Nix: use the Determinate Systems installer, then follow the nix-darwin README.
The appendix apps have their own install line at the end of the appendix.
After installing, open each app once. Most of them will ask for a permission in System Settings → Privacy & Security; they don't work until you allow it.
If something isn't working:
- A shortcut does nothing: another app owns that key. Check Raycast's hotkeys and your AeroSpace config for the same key.
- It stopped working after a macOS update: turn the app off and on again in System Settings → Privacy & Security → Accessibility.
- Espanso won't expand in the terminal: turn off Secure Keyboard Entry (Terminal menu → Secure Keyboard Entry).
- Still stuck: paste the step and what happened into Claude. That's how I fix nearly all of mine.
Questions people ask me
Will this mess up my Mac? How do I undo it? Everything here is a normal app, and quitting AeroSpace makes your windows float again, exactly like before. To remove something completely:
- Raycast:
brew uninstall --cask raycast, then turn Spotlight's shortcut back on in System Settings → Keyboard → Keyboard Shortcuts → Spotlight, or Cmd+Space does nothing. - AeroSpace: quit it, delete
~/.aerospace.toml, thenbrew uninstall --cask aerospace. - Borders:
brew services stop borders, thenbrew uninstall borders. - Espanso:
espanso service unregister, thenbrew uninstall --cask espanso. - Hammerspoon: quit it, delete the
~/.hammerspoonfolder, thenbrew uninstall --cask hammerspoon. - Karabiner: open its settings and use its own Uninstall button.
- Anything else:
brew uninstall --cask <name>with the name from the install commands above, or drag the app to the Trash.
If Claude did the setup, its log at ~/mac-setup-log.md lists everything it touched, with backups of any file it changed.
Can I do this on a work laptop? Ask IT first. Homebrew needs an admin password, and AeroSpace, Hammerspoon and Karabiner need permissions some company laptops lock down. Raycast is usually fine.
Do I have to use H, J, K and L?
No. In the AeroSpace config, change alt-h to alt-left, alt-j to alt-down and so on, and the arrow keys do the same thing.
I type accented letters with Option (like Option+E for é). Will this break that?
Yes, for the letters AeroSpace uses. Either pick a different modifier in the config (ctrl-alt-h instead of alt-h, for example) or type accents another way, like holding the letter key down for the accent menu.
I'm on Windows or Linux. What's the equivalent? On Windows: PowerToys Run instead of Raycast, and GlazeWM instead of AeroSpace. On Linux: Hyprland (what I used before the Mac) or i3.
Does AeroSpace work with more than one monitor? Yes. Each monitor shows its own workspace. The one annoyance is that unplugging a monitor piles everything onto the laptop screen, which is why I have a Hammerspoon script that puts things back.
What does it cost? Everything in the levels is free except Homerow (a one-time purchase, free to try). Raycast and Wispr Flow have paid plans, but you can start on the free ones. Claude Code needs a paid Claude plan. In the appendix, Superhuman is paid.
Cheat sheet
| Keys | Action | Tool |
|---|---|---|
| Cmd + Space (mine is Option + D) | Search anything / run a command | Raycast |
| Option + V | Clipboard history | Raycast |
| Option + E | Emoji picker | Raycast |
| Option + H / J / K / L | Focus left / down / up / right | AeroSpace |
| Option + Shift + H / J / K / L | Move window | AeroSpace |
| Option + 1 to 0 | Go to workspace 1 to 10 | AeroSpace |
| Option + Shift + 1 to 0 | Send window to workspace | AeroSpace |
| Option + Tab | Back to last workspace | AeroSpace |
| Option + F | Fullscreen | AeroSpace |
| Option + Space | Float / unfloat window | AeroSpace |
| Option + S | Reset layout to tiles | AeroSpace |
| Option + T | New terminal window | AeroSpace |
| Option + B | New browser window | AeroSpace |
| Ctrl + Option + letter | That app's own workspace | AeroSpace |
| Hold fn, talk, let go | Dictate into any text box | Wispr Flow |
| Option + Q | Close window under the mouse | Hammerspoon |
| Option + Y | Dismiss notification | Hammerspoon |
| Option + ` | Something went wrong: send the last 90 s to Claude | Hammerspoon |
| Caps Lock | Escape | Karabiner |
;; + a word (;;cal, ;;sig, ;;date) | Type a saved snippet | Espanso |
Words you might not know
- Tiling window manager: an app that arranges your windows into a grid automatically, so they never overlap.
- Workspace: a full screen of windows you can switch to instantly. Like macOS Spaces, but faster.
- Floating window: a normal Mac window you can drag around, outside the grid.
- Modifier key: Command, Option, Control or Shift. Keys you hold while pressing another key.
- Text expander: an app that swaps a short code you type (like
;;sig) for longer text you saved. - Dictation: talking instead of typing; the app turns what you say into text.
- MCP (Model Context Protocol): a standard way to plug an AI like Claude into another app, so it can read from it and act in it.
- Script command: a small file that Raycast turns into a searchable command.
- Config file: a plain text file that tells an app how to behave. AeroSpace's is
~/.aerospace.toml. - Homebrew: a tool for installing Mac apps by typing one command in the terminal. Get it at brew.sh.
- Nix: a tool that builds your whole computer setup from text files, so you can rebuild or copy it with one command.
- nix-darwin / home-manager: the two add-ons that let Nix manage a Mac's settings and the config files in your home folder.
- Git: a tool that keeps the full history of a folder of files, so every change can be seen and undone.
- Claude Code: Anthropic's AI agent that works in your terminal and can write and edit files for you. It's how I build and fix nearly all of this.
Appendix: nice to have
Useful, but none of these changed how I work the way the levels above did. Add one if it fixes a problem you actually have. Unless it says otherwise, each is free.
Mac fixes
| App | What it does |
|---|---|
| SketchyBar | Replaces the top menu bar with one you design. Fiddly to set up, but mine shows exactly what I want (picture below) |
| Shottr | Screenshots you can mark up, and it copies the text out of any image. Free, with paid extras |
| Ice | Hides menu bar icons you don't need |
| Stats | CPU, memory, battery and network in the menu bar, so I know when something is eating my laptop |
| BetterDisplay | Sharper scaling on external monitors than macOS offers, and brightness control for them. Free, with a paid Pro version |
| LinearMouse | Lets the trackpad and mouse go faster than System Settings allows |
| AlDente | Caps how far the battery charges, which is easier on it if you're always plugged in. Free, with a paid Pro version |
| f.lux | Makes the screen warmer at night, and goes warmer than Night Shift |
| Bluesnooze | Turns Bluetooth off while the Mac sleeps. My Bluetooth keyboard kept waking it up in my bag |
My top bar, built with SketchyBar. On the left are my workspaces (the highlighted one is where I am, with a little icon for each app that's open). In the middle is the date, time and my next calendar event. On the right are CPU, memory, battery, wifi and volume.

Apps I live in
| App | What it is |
|---|---|
| kitty | A fast terminal. I spend more time here than anywhere but the browser |
| Dia | My browser, with AI built in |
| Superhuman | Email, built around keyboard shortcuts. Paid |
| Beeper | WhatsApp, Signal, LinkedIn and more in one inbox |
| Morgen | Calendar app that shows all my calendars in one place |
| Obsidian | My notes. Plain text files on my own computer |
| Linear | My task board |
| Bitwarden | Passwords |
Under the hood
| App | What it does |
|---|---|
| Dayflow | Records my screen and turns it into a timeline of my day |
| ActivityWatch | Tracks which apps and websites I spent time in |
| Tailscale | A private network between my laptop, phone and home server |
| OrbStack | Runs Docker and Linux on the Mac, lighter than Docker Desktop |
| IINA | A video player that opens everything |
Install the Mac fixes in one go (delete any you don't want from the line):
brew install --cask shottr jordanbaird-ice stats betterdisplay linearmouse aldente flux-app bluesnoozebrew install FelixKratz/formulae/sketchybarSketchyBar shows nothing until you give it a config. Start from its setup guide, or point Claude at mine.
If you try any of this, tell me what stuck and what you hated. I'm curious which parts survive contact with someone else's brain :)